A Sparkle and a Smile

Sunday, August 28, 2016

The Drugstore Highlighter I'm Currently Loving: NYX Bright Idea Illuminating Stick

Hello Beautiful Ones!

We're in the months now where summer is starting to fade into fall. Losing the bright summer months can get me a little down. Although I will admit I am a little excited for apple cider and boots weather (shh don't tell anyone). I plan to make that glowy summer feeling last as long as humanly possible. Also, I've been on a major highlighter kick lately. That brings us to today's review: the Nyx Bright Idea Illuminating Stick in Lavender Lust.


What's better than a good highlighter? A highlighter in stick form. Yay for easy application and portability! The NYX Bright Idea stick comes in a range of 12 colors that includes highlighters, blushes, and bronzers. As I mentioned I'm a sucker for highlighters and I also have a love for purple so I really didn't even notice any of the other shades on the display at Ulta if I'm honest. I grabbed the highlighter in the shade Lavender Lust. 

As I said, I prefer my highlighters in stick form because they are fast and easy to apply no matter where you are. I find that this one is especially easy because it's the perfect size. Not too big or too small, it's just right (seriously Goldilocks would be proud!). It also fits easily in a makeup bag or your purse for touchups. 


Now let's get to the main event: the color. This shade is just so pretty. It gives you the perfect highlight with just a touch of violet hue. The color payoff really is good here. Just a few swipes on my face and I'm good to go. It also blends extremely easily. It doesn't stay forever, but the lasting power is still good. 


The bottom line? At $8 a piece this highlighter is a great value! 100% recommend. I'm probably gonna be rocking this long into the winter in an attempt to pretend it's still summer, ha! You can find the NYX Bright Idea Illuminating Stick in drugstores or on the NYX website. 

Let me know if you've tried this, or any highlighters you're loving right now!

XO- Brittney

Read More
Pin ThisShare on TumblrShare on Google Plus

Saturday, July 23, 2016

Katy Kat Eye Waterproof Mascara Review

Hello Beautiful Ones!

I'm alive! It feels like it's been a million years since I've blogged. Sometimes you just have to feel inspired you know? Writer's block is not a myth. But I've been officially pulled out of my funk by a new mascara (what else?!). Not only is it new but it's also drugstore. That means my wallet is as happy as I am. Today I'm reviewing the Katy Kat Eye Waterproof Mascara from Covergirl.


This mascara joins the Covergirl Katy Perry collection along with her Katy Kat Matte lipsticks. They get bonus points for the clever names. The Katy Kat Eye mascara comes in both a waterproof and regular formula. I opted for waterproof because we are in the middle of a heat wave here in Nebraska. The heat index here is currently 106 degrees, so waterproof is greatly appreciated. While the regular formula comes in three shades the waterproof has only one: very black. This mascara retails at an affordable $7.99.


Let's start as always with the packaging. I really like the sleek black and white. Very striking and modern (am I describing interior design right now or mascara? I don't even know any more). The first thing that caught my attention was the brush. Covergirl describes it as a "360 degree brush" that is designed to create volume. Basically there is a blank section with no bristles that spirals it's way up from the top to the bottom. This allows the bristles to get a better grip on your lashes. Does it work though? Yes! The first time I used this I couldn't believe how well it coated and separated my lashes. I am blessed with naturally long lashes but this made them look even longer and my eyes even bigger. The only thing I didn't love was that I always seemed to get extra product on the brush which usually meant some smudges during the application process.


Now on to the next question... is this stuff actually waterproof? I don't know about you but if I hear that something is waterproof I expect it to survive a hurricane. Thankfully I haven't had the chance to test this one in a tropical storm but I can say that I am very impressed! So far it has survived a full day of work, a run, and even a shower! In fact it works so well that I sometimes struggle with actually removing it. Covergirl is not playing around when they say waterproof, this thing isn't coming off until you want it to.


So what's the final verdict? This is a major winner in my book! I've been wearing it for a few weeks now and I've been really loving the results. And at only $7.99 it is worth every penny I promise.

Let me know if you've tried this one in the comments! I hope you're have a fun and sparkly summer, I'll go back to trying not to melt now. But at least my mascara will be on point. :)

XO- Brittney

Read More
Pin ThisShare on TumblrShare on Google Plus

Monday, May 30, 2016

Milk Makeup: Highlighter + Eye Pigment Review

Hello beautiful Ones!

Man it has been a hot minute since I have blogged anything, and I mean that literally since it's 85 degrees outside! The warmer weather has me looking for some fun new things to mix up my makeup bag. And what do I love even more than a new product? A new beauty brand to fall in love with of course! Today I'm testing a brand that I've seen popping up lately: Milk makeup. I'm reviewing the Highlighter in Lit and the Eye Pigment in Peep Show.


Milk Makeup comes from the Milk media brand based in New York and LA that specializes in fashion, beauty, photography, and film. Milk describes itself as "a hub for nurturing creativity and supporting partnerships with some of the industry's most visionary talent and innovative brands"The Milk Makeup line is new this year and features products with multiple uses that are made from natural ingredients. The colors are meant to be inclusive to both bold and natural looks. The idea is a cool look with minimal effort, and let me tell you I AM ALL ABOUT THAT.


The first product I gravitated towards was the highlighter. As someone whose natural shade is somewhere between paste and pale ghost, I am always looking for a subtle way to add a little color to my face. The highlighter comes in a solid stick form and is currently only available in one shade: Lit (According to my 18 year old sister, "lit" is what all the kids are saying these days :)). Lit is a subtle glowy champagne highlight and honestly I haven't stopped using it in the last few weeks since I bought it. The stick makes application beyond easy: just swipe it on and blend it in. As I said it is subtle, but I find that it gives me the exact amount of natural glow that I'm going for. The highlighter retails at $24 and is totally worth the money in my opinion.


The next product was something I just had to try because it looked so fun: the Eye Pigment. The Eye Pigment is currently available in 6 shades and I picked up Peep Show which is a sort of a slate grey/taupe color. I should probably just point out now that you might want to avoid this one if you're not a big glitter fan, because there is some serious sparkle involved here. This shadow comes in a tube and squeezes out with a consistency of glitter glue. What I love about it is that you can really build up the color/sparkle gradually. Just a teeny tiny amount will give you a little color and a lot of sparkle or continue to layer it on for a more dramatic look. This wears really well with little to no creasing and can be blended with other powder shadows easily. I don't wear this one everyday like the highlighter, but I still really enjoy it. It's kind of like a secret little weapon when you need to add something fun and unexpected to your beauty routine. You can get the Eye Pigment for $24 as well.


So what is my opinion of Milk Makeup based on these two products? I'm a big fan! I really enjoyed both of these and can't wait to try more! Neither one is overly expensive for high-end makeup and most importantly they both performed really well. The products are versatile, the packaging is minimalistically cool, and the ingredients are natural: what's not to love? Both of these products can be purchased from milkmakeup.com or Sephora's website.

Have your tried out Milk Makeup yet? Any suggestions on what I should try next? Let me know!

XO- Brittney

Read More
Pin ThisShare on TumblrShare on Google Plus

Sunday, April 24, 2016

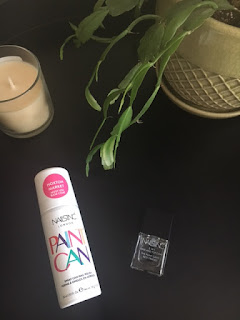
Nails Inc. Paint Can Spray On Nail Polish Review

Hello Beautiful Ones!

We should probably file this one under "things I just could not resist trying for myself." We all know that at-home manicures are definitely cheaper (and you can do them in your PJ's!), but not necessarily easier. Enter in the Nails Inc. Paint Can which you literally just spray onto your nails like spray paint. I know what you're thinking: Does it work? Well today I'm putting it to the test!


When I texted my sister and told her I was doing this her first reaction was "oh my god!" And her second reaction was "wait, how does that work?" I don't even know why she's still surprised at this point. But how does it work? Well, it involves an accompanying 2-in-1 base and top coat that has to be purchased separately called The Paint Can's Best Friend. Here's the step-by-step guide.

Step 1: Paint your nails with the base coat and let it dry.


Step 2: Shake the Paint Can and then spray your nails from about 4 inches away (the polish will also get on your skin and that's ok!). Let it dry for a couple of minutes.


Step 3: Paint your nails with the top coat and let it dry.


Step 4: Wash your hands with soapy warm water to remove the excess polish (being patient and gentle here is key).


Some (hopefully) helpful tips:

-Be extra careful when painting the base coat because that's what the polish is going to stick to (so try to stay away from your cuticles and cover the entire nail).
-I highly recommend laying down some newspaper or an old sheet when you are spraying the polish because it does get EVERYWHERE.
-Spray as evenly as you can and don't be afraid to do a couple of thin coats instead of all at once. Make sure you're staying about 4 inches away and not too close.
-Try not to touch anything you care about until your have washed the excess polish off your hands (she says as she scrubs neon pink off her T.V. remote).
-As I mentioned above, washing off the excess polish works best if you take it slowly and gently.
Now that we've established how it works, let's talk about if it works. Honestly, the whole thing went much better than I expected it to. After reading some pretty negative reviews my expectations were less than high. It seemed like a lot of steps for something that claims to be fast, but I was pleasantly surprised to find that the base/top coat dried pretty quickly so I didn't have to wait long between each step. 

Currently the Paint Can comes in only three colors: Mayfair Lane (light pink), Shoreditch Lane (metallic silver), and Hoxton Market (hot pink). I'm guessing there are plans to expand on the color selection depending how well this first run goes over. Obviously I opted for the hot pink. It's a gorgeous color with a light shimmer to it and the color payoff is pretty good.

Now let's talk about durability. This is where it gets a little rocky. I started seeing some chipping after the first day of wear, particularly on my thumbs. The chipping is mostly centered on the nails I use most often (thumbs and index fingers). Here's a shot of each hand after 3 solid days of wear:


You can get the Paint Can for $12 with an additional $8 for the Paint Can's Best Friend 2 in 1 Base and Top Coat. The Paint Can is available from the Nails, Inc. website and Sephora.

So what's my final verdict here? The entire experience of applying the Paint Can was actually really fun! It was a nice little break from the "normal" process of painting my nails. With that being said, I wish it didn't chip so quickly. But I think with some improvements to the formula Nails, Inc. could really be onto something here!

Is it perfect? No. But if you're looking for something fun and new to splurge on then this might be exactly what you're looking for! Let me know if you're planning to try the Paint Can in the comments.

XO- Brittney

Read More
Pin ThisShare on TumblrShare on Google Plus

Thursday, March 24, 2016

Too Faced PB&J Eyeshadow Collection - Swatches & Review

Hello Beautiful Ones!

It's peanut butter jelly time! (Sorry, I actually tried to write this post without including that and I just couldn't do it). Every once in awhile I run across a beauty product that stops me dead in my tracks. This little eyeshadow palette is one of those products: the Too Faced Peanut Butter & Jelly Eyeshadow Collection.


Too Faced took their popular shadow color: peanut butter from their Semi-Sweet Chocolate Bar palette and added 8 other coordinating shades to create a brand new mini eyeshadow collection that is good enough to eat. Oh and as if it couldn't get any better they made it smell like actual peanut butter. Take my money please! (Don't worry though, it doesn't actually contain nuts in case you have an allergy to worry about).


The collection includes three larger shadows: Spread the Love, Bananas, and Extra Creamy. And six smaller shadows: Peanut Butter, Peanut Butter Cup, Peanut Brittle, Jammin', Jelly, and Nuts About U. The colors are very creamy and the overall collection has a good combination of matte and shimmer shades. I've found myself using Bananas, Peanut Butter Cup, and Jammin' the most. 


Along with being very creamy all of these shadows wear very well. I wore them without any eyeshadow primer and they held up during an eight hour work day with little to no creasing. This is a cute little palette that has a mix of unique and neutral colors. It's small enough that it could travel easily, but still has a decent sized mirror. 

Bottom line? I'm nuts about this one! (I'm sorry, I'll stop). You can get it from Too Faced or Ulta for $36, but you better hurry cause they're selling out like crazy! 

Let me know if you've tried this one! 

XO- Brittney

P.S. Follow me on Twitter or Bloglovin' to know every time I write a new post! 
Read More
Pin ThisShare on TumblrShare on Google Plus

Sunday, February 28, 2016

Fab or Flop: Jergens Wet Skin Moisturizer

Hello Beautiful Ones!

Hello sunshine! Hello happiness! Hello spring vibes! It's becoming that time again to prepare our skin for spring, and oh how happy about that I am. I've been soaking up all the sun I can possibly get in the last few days. Along with boosting my mood the warmer weather also has me trying to wake up my dull winter skin with some moisture. Enter in the new Jergens Wet Skin Moisturizer. But is it a fab or a flop?


The concept behind this moisturizer is that you put it on after you have showered, but before you dry off. When I first heard about this I figured that it was similar to the Nivea In-Shower Body Lotions that came out last spring, but the difference is that this one doesn't get rinsed off. You just rub it into your skin and then pat dry with a towel. According to Jergens this will help your skin absorb the moisturizer 2 times faster and therefore cut your getting ready time by half. The moisturizer comes in 3 scents: refreshing coconut oil, calming green tea oil, and nourishing monoi oil. I picked up the green tea one because that's all that was left at the drugstore. :)

So blah, blah, blah... the question is did it work? It did! I did exactly as the directions said and applied the lotion after I had turned off my tap but before I toweled off. I hope your bathroom is warm, because this does require you to stand while wet for a minute or two. It was easy to rub in, then I patted dry with my towel. My skin did feel very moisturized immediately. It does cut a little time in your routine as well because you don't have to wait for the lotion to absorb in before you get dressed. I will say that it has a pretty strong lotion scent initially, so if that bothers you this might not be the one for you.

Overall I rate the Jergens Wet Skin Moisturizer as a fab! Spring ready skin here I come! Let me know if you've tried this one. And make sure you enjoy a little sun for me!

XO- Brittney

Read More
Pin ThisShare on TumblrShare on Google Plus

Sunday, February 21, 2016

L'Oréal True Match Lumi Cushion Foundation Review

Hello Beautiful Ones!

I feel like it's time for a good drugstore product review. With spring fast approaching (yay!) there are a lot of exciting things landing in the beauty world right now. One thing that keeps catching my attention both on the shelves and in the blogosphere is the L'Oréal True Match Lumi Cushion Foundation. Cue the review!


I should probably start this review by saying that I typically shy away from drugstore foundation. I've just never had much luck with it, and I hate the fact that I can't swatch and color-match in store. I'd much rather spend a little more than just randomly guess my shade based on a picture. With that being said: I've heard so many good things about this one that I could not resist. I chose the lightest shade on the display: W2 Light Ivory, which just so happened to be my exact shade (score!).


The Lumi cushion is a liquid foundation that is soaked into a sponge housed by a compact. The size of the compact is the perfect size. It's small and sleek enough that you could easily slip it in a bag for travel. It comes with a pad applicator. I was skeptical about how helpful the pad would be since it looks and feels very flimsy, but it does distribute the product very well. You dip the pad (or your own sponge or brush) into the sponge and then tap the foundation lightly onto your skin, building as you go along.


What's so great about foundation that comes out of a sponge you ask? Well dear friend, the magical part is that the sponge only gives you a little bit of product at a time so you aren't caking it on, only building it up gradually until you get just the right amount of coverage for you. There also has to be something said about the formula, which is fabulous. This is its own breed of drugstore foundation you guys. The coverage is very good (about medium to full) and yet it feels so light on your skin. I don't feel the need to use a lot of concealer or sometimes any when I wear this. I also feel like it gives me a little glow to my complexion. The lasting power is also good. I've been wearing it to work all week and it's always still doing its thing by the end of the day when it's time to wash it off.

So the bottom line here... I think I'm in love! The Lumi Cushion Foundation retails for $15.99 at drugstores and I promise you is worth every single penny.

Have you tried this one? Let me know!

XO- Brittney
 
Read More
Pin ThisShare on TumblrShare on Google Plus

Sunday, January 31, 2016

Love Yourself (As Justin Bieber Says)

Hello Beautiful Ones!

It's been a long time no blog hasn't it? I've just been finding myself in a little bit of a funk lately. I'm blaming it on the dreary and freezing winter weather, but today is pleasantly warm and sunny even though the weatherman is delightfully forecasting a blizzard this week (ugh). One thing this funk has done is get me thinking about taking care of myself when I need it most. So the title of this post (like Justin Bieber's hit song) is: Love Yourself.


I know that sounds cheesy, but I'll bring it back I promise. First of all, I mentioned Justin Bieber. Say what you want about his very public antics, his current hit titled Love Yourself (with some writing help from Ed Sheeran) is one of my favorite songs right now. In case you haven't heard it he's talking to an ex and basically saying that being with her and trying to meet her standards made him into someone he didn't like and now she can go love herself. Deep right? The song is all about listening to your own needs and putting yourself first.

That's what I've been trying to focus on these last few weeks. How you ask? Pretty simple. First of all, I've been trying to eat a little better and exercising more (I'm talking actual physical activity here!). I think that both the kitchen and the gym can be pretty intimidating if you're not very experienced. I've definitely learned that! Let's just say i've eaten more than slightly burned chicken for at least one meal, but the experience has been very positive overall. And as for the gym, you have to acknowledge the fact that you're not going to be running a seven minute mile in one day. I know this one seems a little obvious, but if you're ever feeling discouraged by your progress just remember it's better than the milage you'd be getting on your couch. I've also started writing down the results of my workouts (miles, time, etc.) in my planner so that I can look back and see just how much I really am improving.


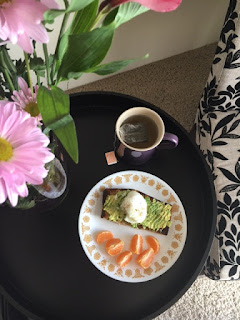
I've also been trying to find my happy place in the little things. It can be as simple as losing myself in a good album or book. I've been listening to Hoodie Allen's Happy Camper and reading Tyler Oakley's Binge (both are fantastic by the way!). Just this morning after a run and before making the yummy/healthy breakfast pictured above I took a nice long hot shower with my favorite shower gel: Lush's Happy Hippy. If you've never had the pleasure of trying it I can only describe it as sunshine in a bottle (it's that good I promise!). It has a bright citrus scent and is the perfect pick-me-up in the morning (or anytime). I also try to pick up fresh flowers when I can and put them in a vase on my entryway table. Coming home to a bright cheery bouquet even in the dead of winter is so lovely. Sometimes happiness really is in the little things.


I know none of these things I've mentioned are earth shattering and they're probably not new to you, but they've made a big difference for me. Sometimes you just need to take a little time to yourself and find a way to hit the reset button. Whatever your method is, I hope you remember to love yourself.

XO- Brittney


Read More
Pin ThisShare on TumblrShare on Google Plus

Sunday, January 10, 2016

Blog Goals 2016

Hello Beautiful Ones!

Or should I say, Happy New Year beautiful ones?! I've definitely been spending the last week dating everything 2015 and then having to cross it out afterwards, oops! Maybe I'll get it by March. But every year the New Year seems to creep up on me. Instead of making hard and fast resolutions that I most likely won't keep I usually try to think about the things I want to accomplish or work on getting better at. This year I wanted to do the same thing not only for my personal life, but this blog as well.


A Sparkle and a Smile will be coming up on its 2 year anniversary in March, which is absolutely crazy to me! I'm not at all the same person that I was when I started writing this blog, and I'd like to think that the blog itself has evolved as well. It began as a way for me to share my thoughts on the various makeup and beauty products I am constantly testing out, but has now also grown into a place where I can share my thoughts not just about beauty things but life in general.

In the last couple of months though I haven't been posting as much. Maybe it was lack of inspiration, lack of motivation, or the frigid gloomy weather giving me the blues. I'm not really sure, but I started making myself feel really bad about it. I had it in my head that I just needed to throw a post up there for the sake of consistency, but as you may have guessed content usually doesn't turn out too great when you create it that way.

And maybe most importantly it wasn't true to the purpose of this blog: writing about things that make me happy. I want this blog to be able to showcase every sparkly side of life (some a little more sparkly than others), not force out posts because I feel that I need to. So my goal for this blog in 2016 is to write when I am inspired and forgive myself if I miss posting for a week or two.

Do you have any New Year's resolutions, or are you most excited to start a new journey? Let me know! Either way I hope your 2016 is full of sparkle!

XO- Brittney

Read More
Pin ThisShare on TumblrShare on Google Plus